why make this recipe
Granola & Berries Frozen Greek Yogurt Bars are a delightful and healthy snack option. They are perfect for a hot day or as a quick breakfast. With layers of granola, berry goodness, and creamy yogurt, they are tasty and satisfying. Plus, they’re easy to make and can be stored for later, making them a practical choice for busy days.
how to make Granola & Berries Frozen Greek Yogurt Bars
Ingredients:
- 1/3 cup almond butter
- 2 tbsp pure maple syrup
- 2 tbsp applesauce
- 1 tbsp almond milk
- 1/2 tsp vanilla extract
- 1 cup oats
- Pinch of salt
- 1 cup berries
- 1 tbsp water
- 1 tbsp pure maple syrup (for the berry mixture)
- 1 cup plain Greek yogurt
- 1 tsp vanilla extract (for the yogurt layer)
- 3 tbsp pure maple syrup (for the yogurt layer)
Directions:
- In a mixing bowl, combine the almond butter, applesauce, maple syrup, almond milk, oats, vanilla extract, and salt to make the granola mixture.
- Line an 8×8 baking dish with parchment paper and flatten the granola mixture into it.
- Place the dish in the freezer while you work on the other two layers.
- In a small pot, combine the berries, water, and maple syrup over low-medium heat.
- Smash the berries and let the mixture boil for a few minutes until it thickens. Remove from the heat and place it in the fridge to thicken further.
- For the yogurt layer, mix the Greek yogurt, maple syrup, and vanilla extract evenly.
- Remove the granola layer from the freezer and pour the berry mixture on top. Spread it evenly and place it back in the freezer to set for about 30 minutes.
- After 30 minutes, remove from the freezer again and pour the yogurt layer on top. Spread it evenly. (Optional: Make a swirly design with a toothpick at this point!)
- Place it in the freezer again to set completely for 1-2 hours or until the yogurt is solid.
- Once set, remove from the freezer, cut into bars or squares, and enjoy!
- Store any leftovers in the freezer.
how to serve Granola & Berries Frozen Greek Yogurt Bars
These bars can be served as a snack, breakfast, or a refreshing dessert. You can enjoy them straight from the freezer or let them sit out for a few minutes to soften a little before eating.
how to store Granola & Berries Frozen Greek Yogurt Bars
Store these bars in an airtight container in the freezer. They can last for about a month, but they are best enjoyed within a couple of weeks for optimal taste and texture.
tips to make Granola & Berries Frozen Greek Yogurt Bars
- Make sure to line the baking dish with parchment paper for easy removal of the bars.
- Feel free to mix different berries, such as strawberries, blueberries, or raspberries, to suit your taste.
- You can adjust the sweetness by varying the amount of maple syrup in the yogurt layer.
variation
You can try adding nuts or seeds to the granola layer for added crunch. Substituting the almond butter with peanut butter is another great option if you prefer its flavor.
FAQs
- Can I use frozen berries? Yes, frozen berries work just as well. Just make sure to thaw them slightly before cooking to help with the smashing.
- How long do these bars last in the freezer? These bars can last up to a month in the freezer, but for the best taste and texture, enjoy them within a few weeks.
- Can I use a different type of yogurt? Yes, you can use any flavored or dairy-free yogurt if you prefer, but plain Greek yogurt provides a creamy base that balances the sweetness of the other layers.
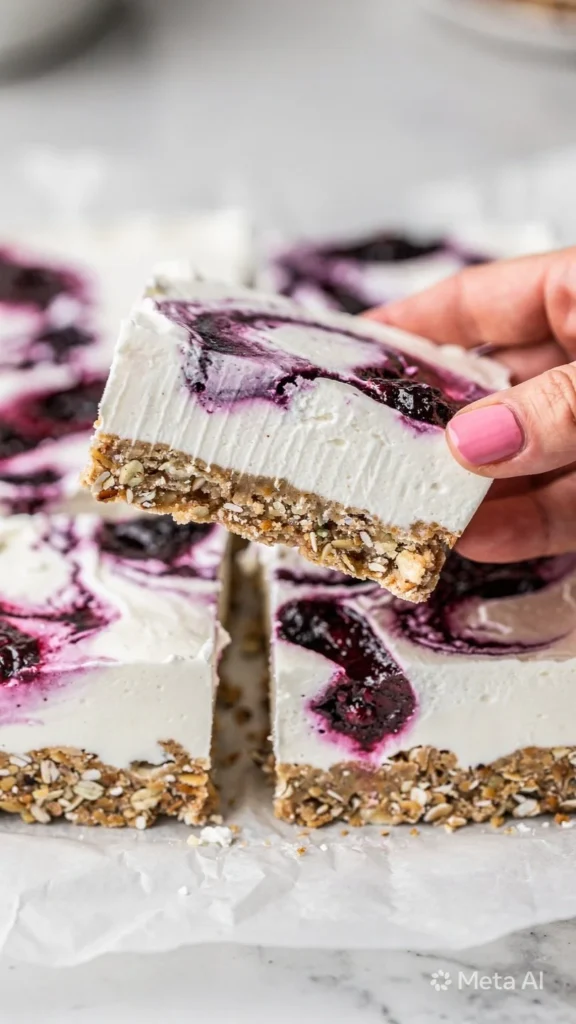
Granola & Berries Frozen Greek Yogurt Bars
Ingredients
Method
- In a mixing bowl, combine the almond butter, applesauce, maple syrup, almond milk, oats, vanilla extract, and salt to make the granola mixture.
- Line an 8×8 baking dish with parchment paper and flatten the granola mixture into it.
- Place the dish in the freezer while you work on the other layers.
- In a small pot, combine the berries, water, and maple syrup over low-medium heat.
- Smash the berries and let the mixture boil for a few minutes until it thickens. Remove from heat and place it in the fridge to thicken further.
- For the yogurt layer, mix the Greek yogurt, maple syrup, and vanilla extract evenly.
- Remove the granola layer from the freezer and pour the berry mixture on top. Spread it evenly and place it back in the freezer to set for about 30 minutes.
- After 30 minutes, remove from the freezer again and pour the yogurt layer on top. Spread it evenly.
- (Optional: Make a swirly design with a toothpick at this point!)
- Place it in the freezer again to set completely for 1-2 hours or until the yogurt is solid.
- Once set, remove from the freezer, cut into bars or squares, and enjoy!